Affichage des articles dont le libellé est noob. Afficher tous les articles

Tutorial on Hacking With Kali Linux

Hacking With Kali Linux


Why Kali Linux?


With Kali Linux, hacking becomes much easier since you have all the tools (more than 300 pre-installed tools) you are probably ever gonna need. Others can be downloaded easily. Now this tutorial will get you started and you'll be hacking with Kali Linux before you know it.


The problem with beginners

Now, I've been dealing with beginners since a long time. What they want is magic. A tool which is easy to use, works on Windows, can be download by searching on Google and clicking on the first link we see, and will do all the hacking itself on the push of a button. Sadly, no such tool exists. Hacking is an art, and it takes years of practice to master it. So how to get started? Having no idea about hacking is okay, but being a newbie with computers in general is not allowed. When I say beginner, I mean someone who has no experience with programming and with hacking methodologies. I didn't mean someone who needs a 1 page guide on how to download a tool. If you want to be a hacker, you have to work hard. So how to get started? If you have installed Kali Linux,  click here to skip past the installation paragraphs and go to hacking section of this post)


Getting Started

Now, I am not boring you with theory (^ As if all this wasn't enough theory). My aim is to get you to the point where you can start hacking with Kali Linux as soon as possible. What I'm gonna do is tell you what to do. The process is rather simple :-


Things get tough now

If you have no previous experience with Linux and virtual machines and all that stuff, getting Kali Linux up and running won't be a piece of cake.You have 2 options :


1. Read the Kali official documentation

That will give you an idea about what is a virtual machine, how OS can be run from USB, and how to create a partition and run 2 OS simultaneously. This is what I recommend. For that, go to Kali Official Documentation .

2. Read my modified version of Kali documentation

The second option is to look at these posts, which are just sparingly modified versions of the Kali docs, and offer no advantage other than saving your time as their documentations cover much more than what the ones here do, and you don't really need to know all so much... yet. I'm linking them up here:


    Command Line Interface

    Some bash commands
    Now, if you are really sure about becoming a hacker, you have to get used to linux, and specifically the command line interface. It is often compared to (and rightly so) to command prompt of Windows, but Linux' cli is much efficient and better than command prompt. What you have to do is do all the usual tasks you do in Windows in cli of Linux. Use cd to navigate, poweroff to shutdown, etc.
    A pretty awesome site for that is - http://linuxcommand.org/
    Going through the complete site is on its own enough exercise to keep you occupied for a month, but you can proceed gradually. The first few tutorials here will keep in mind that you don't have much info about cli, and will be really beginner friendly.


      Some Useful Commands:

      If you don't plan on learning all of linux cli commands, here are a few that will keep your boat afloat.
      1. The default username and password is 'root' and 'toor'. 
      2. Type 'poweroff' in the terminal to shutdown. 
      3. apt-get command can be used to install tools and updates. 
      4. apt-get update and apt-get upgrade will update all the programs installed on your machine. 
      5. apt-get dist-upgrade will install the latest distribution of Kali(i.e. it upgrades your OS).

      PS : Tapping while typing makes Kali complete the word for you . Double tapping makes it display all possible words starting with the incomplete word. Ctrl+c stops the functioning of any tool that is running. Pressing the up arrow key shows the command you last typed.


      Some Real Hacking With Kali Linux

      Assuming you've gone through the above steps and are comfortable with your new hacking environment, its time to do some real hacking with Kali Linux. My recommendation would be to start by hacking a wifi, then do some penetration testing, and maybe read something on Denial of Service when you have free time. Links here-

      Hack wireless networks in Kali Linux using aircrack 

      Penetration Testing In Kali For Beginners

      Denial Of Service Attacks


        ~ mercredi 16 juillet 2014 0 commentaires

        So You Want To Be A Hacker

        Ah! The world of hackers. It has changed much from the fabled green black terminal operated by guys with spectacles on their eyes and a serious look on their face. Now even a script kiddie who types a few lines on a Kali Linux calls himself a hacker. The terminal is still there, but the colors have changed. It's black terminal with text of all colors. But who cares about the colors. It's the new Operating Systems : The likes of Kali Linux,
        Backtrack, BackBox Linux, Node Zero, Blackbuntu, and many more, which have made hacking much easier. However, has it got easy enough? No. Not at all.


        It's getting harder

        When the going gets tough, the tough get going
        While Kali Linux can make hacking Windows XP, wirless networks, and some weak websites very easy, it doesn't mean it is a magical solution to all problems. Everything that can be hacked easily is ancient. No one uses Windows XP anymore, and if they do, the machines are patched because of automatic updates. Very few websites are vulnerable to the standard SQL injection attacks. You'll have to think up and use variants of standard injections to counter the defenses. Yes, WEP networks are easy to hack, and are still abundant, especially in developing countries. But if you want to hack Facebook, then you should step back already, you're going the wrong direction. Facebook isn't paying millions for security so that a kid can Google up the procedure to hack FB and be done with it overnight. But wait, how could I even imagine that you've already reached this point. While all this hacking XP and WEP shit is pretty easy, is it okay to assume you can do it, and are worried about the 'harder' part. Or wait, are you experiencing difficulty in even using Kali Linux. Can't figure out how to install it. Well...

        Oh well

        First time is always the hardest
        In the previous few paragraphs I made a big mistake. I assumed that you have installed Kali Linux and can do some basic stuff with it, and the intermediate level tasks are bothering you. I almost forgot how it was for me. Well let me tell you.


        1. I was 12. Wanted to hack this wireless network next door. 
        2. Download some shitty Windows software. Won't work. Plus had malware installed which had to be removed with antivirus.
        3. More googling, came across BT4. Googled up some tutorials on how to install it. Was too stupid for Vmware. Live? No. Couldn't create a bootable USB. I downloaded the OS and simply copied it to the USB and thought it'll boot. Googled more. Some result said something about boot order. Okay, make USB boot before hard disk. Made some sense, but it wouldn't work. As it is, I was scared as hell when modifying stuff in the scary looking BIOS interface. Hoping I don't do any damage.
        4. Some time later, BT5 was released. Me? A bit smarter this time. Could get BT5 to boot. Read some WEP hacking tutorials. Wasn't able to follow. I even had a tough time with getting the GUI to start. In BT5 we had to type startx for starting X Display server. Didn't know that. Finally, hacked wifi using Aircrack-ng GTK or something (don't remember the name exactly, but it was GUI mode of aircrack, and it was pretty easy for a beginner like me to use it).
        5. Took me an year before I knew how to do stuff without GUI. An year sounds like a long time, but remember, I have much more stuff to do than just hack. I used BT5 once every few months, only when a new network would show up in the neighbourhood, and I would hack it with my laptop. 
        6. Had a great sense of accomplishment inside me. Felt like I was king of this territory, and owned every wireless network here. But then, a WPA-2 network appeared. I tried everything I could, but gave up. I read on hackforums a tutorial on using WPS vulnerability to hack WPA. Well, it looked like it was written in an alien language. Honestly, after knowing how easy hacking WPS enable WPA networks is, I seriously think that the first time indeed is the hardest. 
        7. Fast forward to this moment. I have mastered the basics of linux command line interface, but still have a lot to learn. I can write bash scripts to automate stuff, and can use most of the tools with ease. I am currently studying exploit development and research and can write simple exploits. There's a lot left to learn. I know the depths of wireless pentesting, but only intermediate level of web pentesting. I know the basics of social engineering, but again, lot of things to learn. Now if you are concluding I'm an idiot on the basis of the fact that in every field I just know the basics, well then you need to realize that the meaning of basics in my perspective is much different from that in yours. I need to know a lot of stuff, but I know a lot too.
        So what do you conclude from this? Well if you are not able to install Kali, or follow any other tutorial in my website, then don't be surprised. If everyone who visits this website became a hacker, then we'd be having more than 100k hackers created from this website alone, which isn't a good thing at all, considering there are many other websites which receive much more traffic than mine. 

        Why so difficult

        Hacking is an art
        Because that's the way it is. Hacking is an art, and like any other, it takes practice, hard work and determination to master this art. For example, after watching dynamo on TV, I got lured into the idea of becoming a magician. Well, I tried some tricks, but failed miserably. Realized it was not my piece of cake. Some of the tricks require years of practice before they can be pulled off successfully. Not everyone who decides to be a magician ends up becoming one. There are obstacles in the way, disappointments, milestones too hard too achieve. The ones who stay determined all the way to the end only achieve this. It's not everyone's piece of cake. Same goes with hacking. What makes hackers exclusive and special is the fact that not everyone is a hacker. I am known in my class (whole school as well) for being a hacker. Why? Because I'm the only one. Not everyone who sets out to be a hacker becomes one. But there's more to the story than this.


        Not that difficult

        You are lucky that you ended up on this blog (not a quote as such)
        Well, the sites I used to learn hacking were crap. The WEP tutorial was just 3-4 lines of code and no
        explanation. I won't be wrong if I say that, while I read a lot of tutorials, none was good enough. For every line in a tutorial, I had to google up another tutorial which explained what it meant. That is, I worked hard and figured everything out on my own. You, however, are lucky. The posts in this blog have been written such that everything is properly explained. In the later tutorials I have been a bit lazy, but it won't be a problem if you follow the tutorials in correct sequence. If you have read 2-3 tutorials on pentesting, you would already know the basics, and the 4th one wouldn't have to be very detailed. If you jump to Win 7 hacking without going through XP, then you'll encounter difficulties. Now I have created a page on this blog where I have ordered the posts in the desirable order of reading. You might also look at the navigation menu on top and read all the tutorials on a top to bottom order basis. And here's the truth finally.

        The truth

        I want to hack facebook
        If you are learning hacking to hack your friends account, then you're never going to become a hacker. Just hire someone to do it. Because the time and effort you'll invest in making an attempt to learn how to do it yourself, and eventually  failing in the same, is much more valuable than the money required to hire someone (no I don't hack FB accounts for money). You might still try social engineering, but it is not a 100% working method, and well, phishing is not hacking, and is illegal. However, if you're motives aren't that selfish, and if you are on a quest for knowledge, then rest assured, you will achieve success. Also , you need to know the art of google-fu. If you face any difficulties, remember, google is a friend (and so am I, I have replied to 100s of comments on this blog personally and always get people through difficulties). The last thing, 50% of the people who come to this blog leave within 1 min of their visit, after seeing just one page. 30% stay for 4-10 mins and read 2 posts. 20% stay for more than 10 minutes, and keep coming back. Only these 20% successfully will become a hacker. Either they succeeded in achieving what they wanted, loved the blog, and came back for more, or they didn't succeed, but came back to try again, and I'm sure they would succeed on a second attempt. Remember, never give up. Less than 20% of the visitors here actually succeed in getting what they want, try and be in that 20%. And if you have any suggestion for this post or for my way of explanation or anything else in general, please comment.

        ~ mardi 17 juin 2014 0 commentaires
        Complete Detailed Guide on Installing Kali linux in Vmware

        This tutorial will walk you through the difficult process of installing Kali Linux in VMware Player, a free virtual machine manager that can be downloaded from www.vmware.com. This tutorial assumes that you have some basic knowledge of your computer (amount of RAM number of processors, etc.) This tutorial is also intended for beginners who haven’t worked with VMware or Kali Linux before.


        Step One:

        First we need to download Kali from http://kali.org/downloads/. If you have a 64-bit capable computer (like me), then you probably will want the 64-bit version of Kali for performance reasons. Expand the drop down menu’s to find the version you need. Select the 64-bit version ONLY if you have a 64-bit computer.

        step 1
        Step Two:
        If you don’t have a torrent program, then click the link highlighted above and select “Save” when the download notification appears. Make sure you know where you saved it.
        step 2
        If you have a torrent program, then I highly recommend using the torrent option. Click on theTorrent link, it will open the torrent file in your browser. Just copy the URL of it and enter it in your torrent program.

        step 2.1
        step 2.2
        Now wait for Kali to download, this might take several hours, depending on your internet speed.
        Step Three:
        When Kali has finished downloading, open VMware Player and click Create a new virtual machine.

        step 3
        Step Four: 
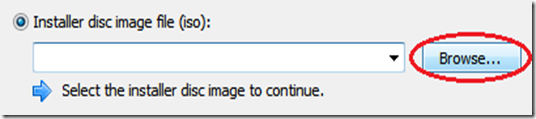
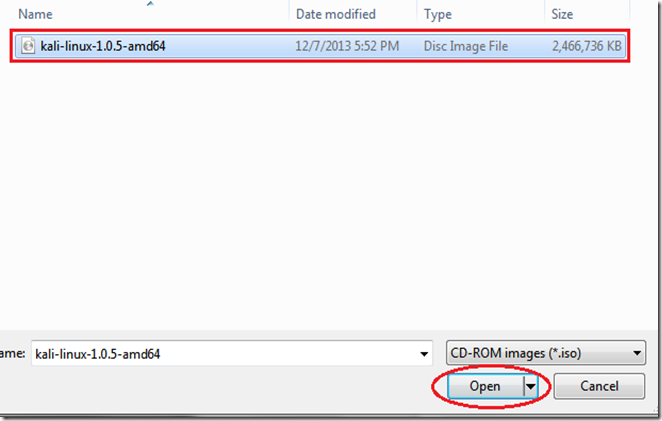
        In the window that opens, select Installer disc image file (iso) and browse to the location of and select the Kali Linux ISO file that you just downloaded.

        step 4
        step 4.1
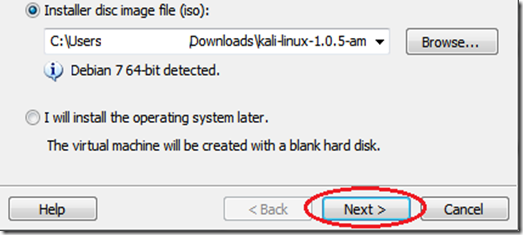
        Once you have selected the file, click Next.
        step 4.2
        Step Five:
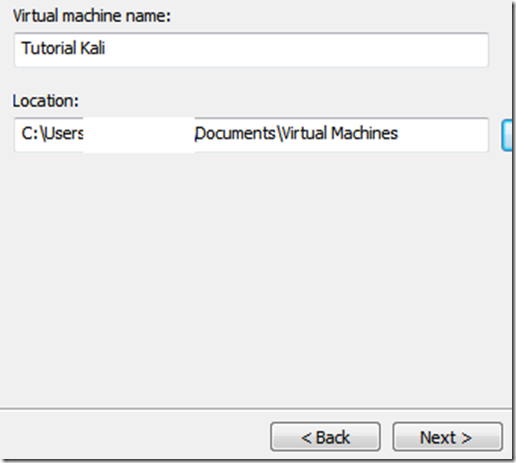
        In the next step, select a name for the virtual machine. I’m going to name it Tutorial Kali for this tutorial. You also need to select a location for it, I recommend creating a folder called “Virtual machines” in My Documents. Then click Next.
        step 5
        Step Six:
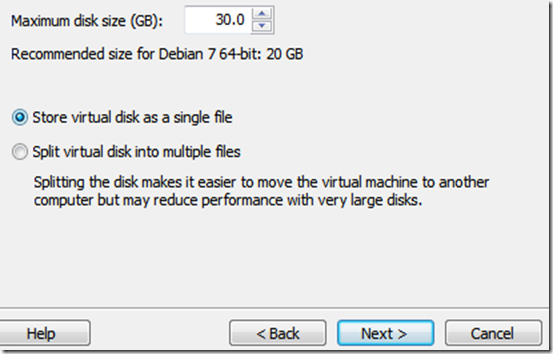
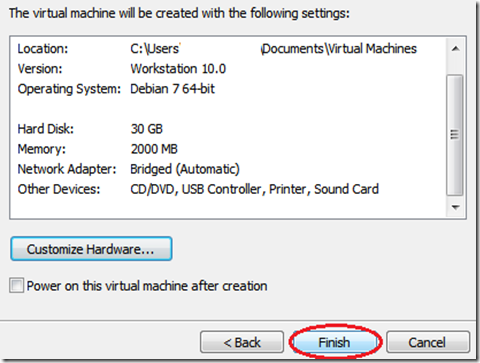
        Next step, you need to select a maximum size for Kali. I recommend doing at least 30 GB’s as Kali tends to expand over time. After you’ve entered your desired value (no less than 20 GB) change the next option to Store virtual disk as a single file and click Next
        step 6
        Step Seven:
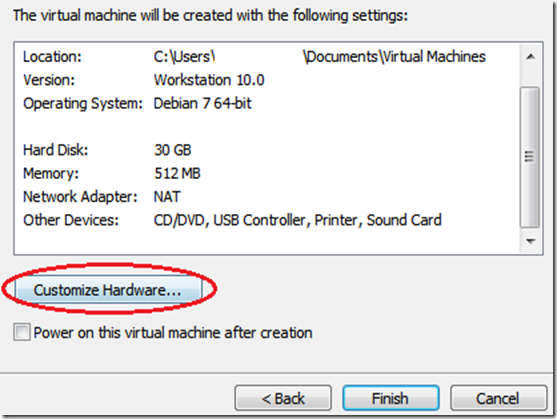
        In the next window, we need to customize some hardware settings, so click on the Customize Hardware… button.
        step 7
        Step Eight:
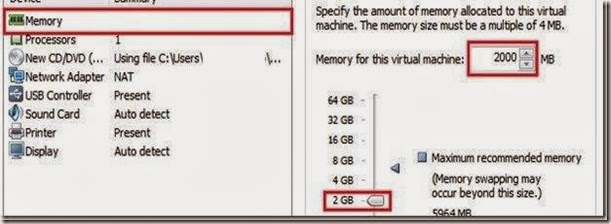
        You will now be presented with a Hardware window. In the left pane select Memory in the left pane of the window, and slide the slider on the right side to at least 512 MB*. This is for performance. Since I have 8 GB of RAM on my computer, I’m going to put it at 2 GB’s (2000 Mb’s).*Note, you should give a virtual machine a maximum of half the RAM installed on your computer. If your computer has 4 GB of RAM, then the max you want to slide it to is 2 GB. If your computer has 8 GB, then you can go to a max of 4 GB etc.. 
        step 8

        Now highlight Processors in the left pane. This option really depends on your computer, if you have multiple processors, then you can select two or more. If you have a regular computer, with two or less, then I suggest leaving this number at one.
        step 8.1

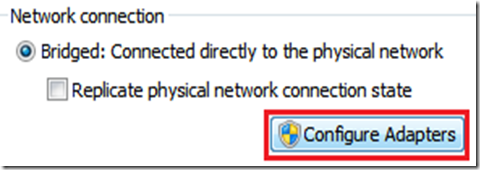
        Moving on, click on Network Adapter in the left pane. On the right side, move the dot to theBridged (top) option. Now click on the Configure Adapters button.
        8.2
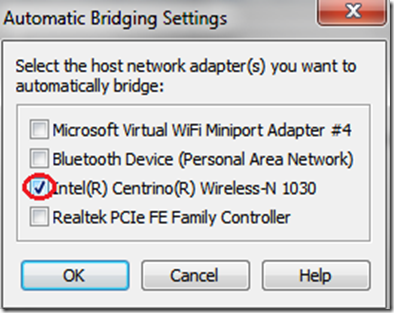
        In the small window that pops up, uncheck all the boxes except for the one next to your regular network adapter and hit OK.
        8.4
        You can now click on Close at the bottom of the Hardware window and then click on Finishin the Wizard.
        step 8.5

        Step Nine
        After you click Finish the window will close and the new virtual machine file will be added to the VM library. Now all we have to do is start Kali and install it! To do this, highlight the name of the newly created virtual machine by clicking on it, and click Play virtual machine in the right pane.
        step 9
        This will start Kali for the first time.
        Step 10:
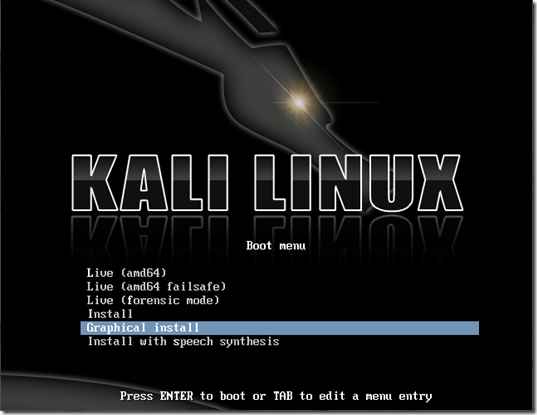
        At the boot menu, use the arrow keys to scroll down to Graphical install and hit enter.
        step 10
        Step 11:
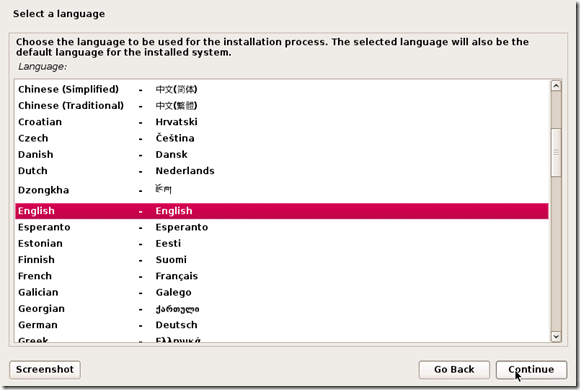
        The next screen will ask you to select your preferred language, you can use the mouse to select this, then click Continue.
        step 11
        Step 12
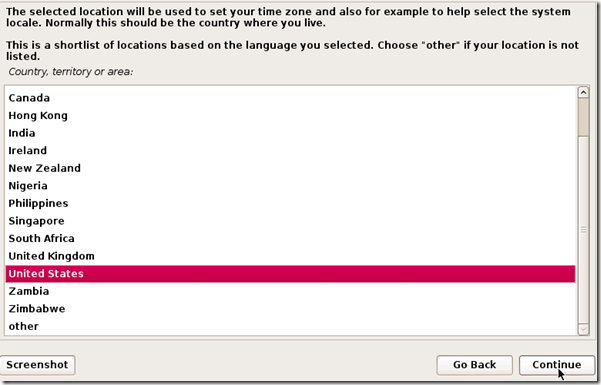
        On the next screen, select your location and hit Continue.
        step 12
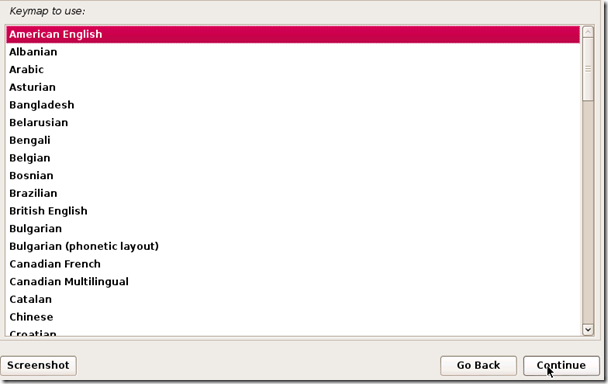
        It’ll now ask you for your standard keymap. If you use the standard American English keyboard, then just click Continue.
        step 13
        Step 14:
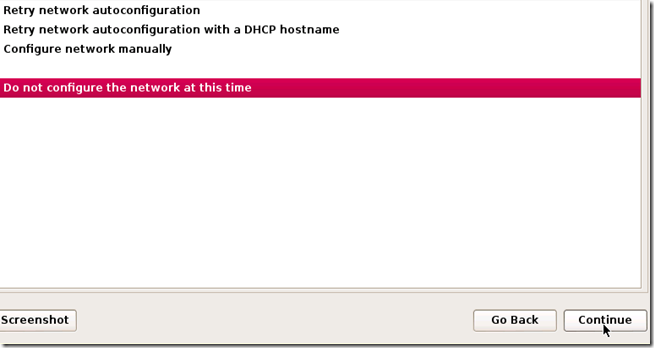
        Wait until Kali finishes detecting the hardware on your computer. During this, you might be presented with this screen:
        step 14
        Just hit Continue and select Do not configure the network at this time on the next screen.
        step 14.5
        Step 15:
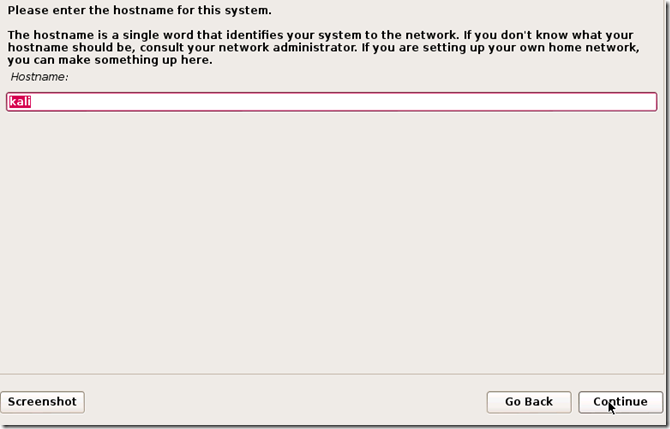
        You will now be asked to supply a hostname, which is kind of like a computer name. You can enter anything you want, or you can just leave it as kali. When you’re done, hit Continue.
        step 15
        Step 16:
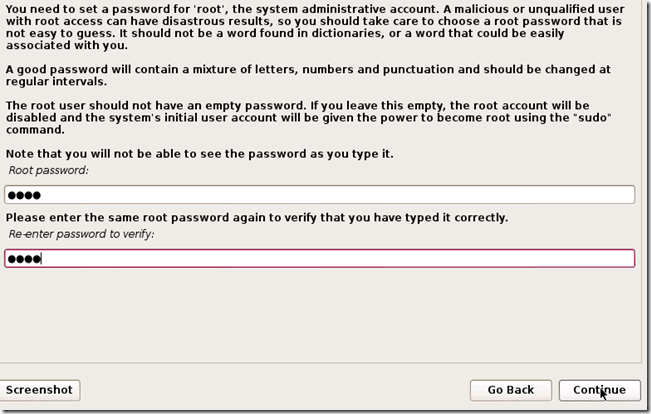
        Kali will now ask you to enter a password for the root (main) account. Make sure you can easily remember this password, if you forget it, you’ll have to reinstall Kali. Hit Continue after you’ve enter and re-entered the password of your choice.
        step 16
        Step 17:
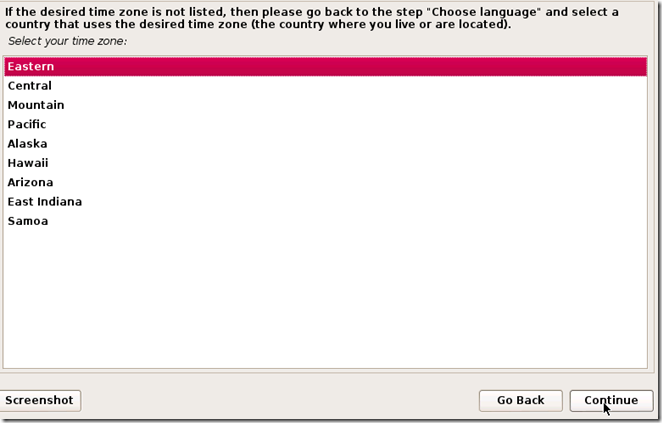
        The next step will ask you for your time zone, select it and click Continue.
        step 17
        Step 18:
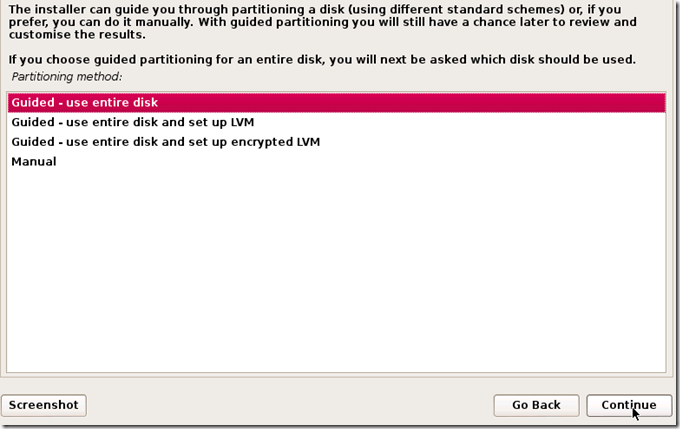
        Wait until Kali detects the disk partitions. When you are presented with the next step, selectGuided – use entire disk. (this is usually the top option) then click Continue.
        step 18
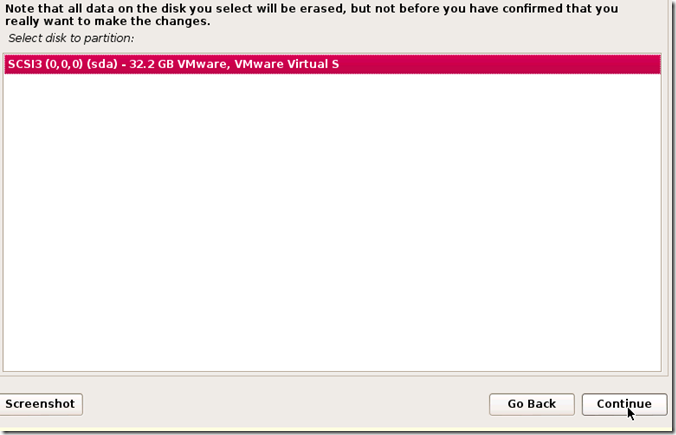
        The installer will now confirm that you want to use this partition. Hit Continue.
        step 18.5
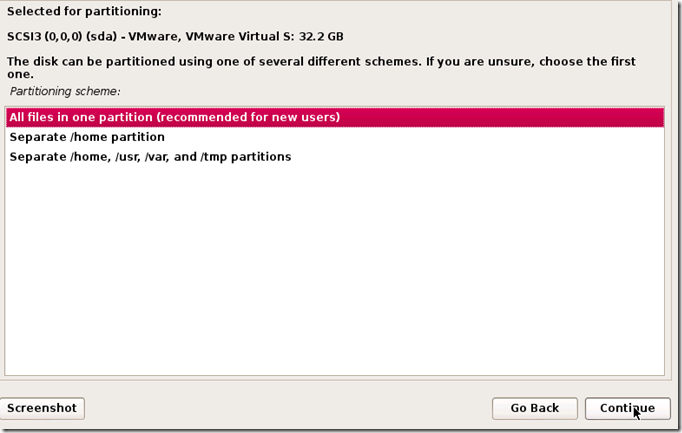
        One more question about the partition will appear. Select the option that says All files in one partition and hit Continue.
        step 18.9
        Step 19:
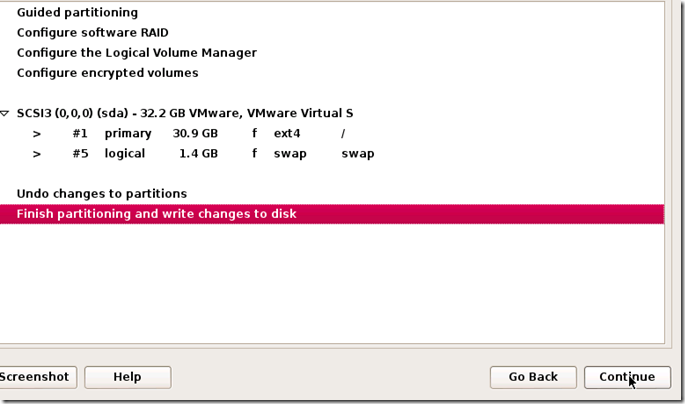
        Confirm that you want to make these changes by selecting Finish partitioning and write changes to disk. Then hit Continue.
        step 19
        Step 20:
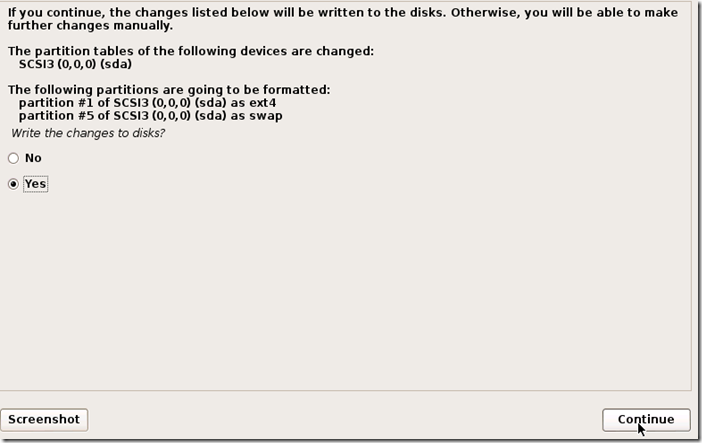
        The last question! Confirm that you really want to make these changes by moving the dot toYes and hitting Continue for the last time.
        step 20
        Kali will now start installing! Wait until it has completed, this might take upwards of 30 minutes.
        Step 21:
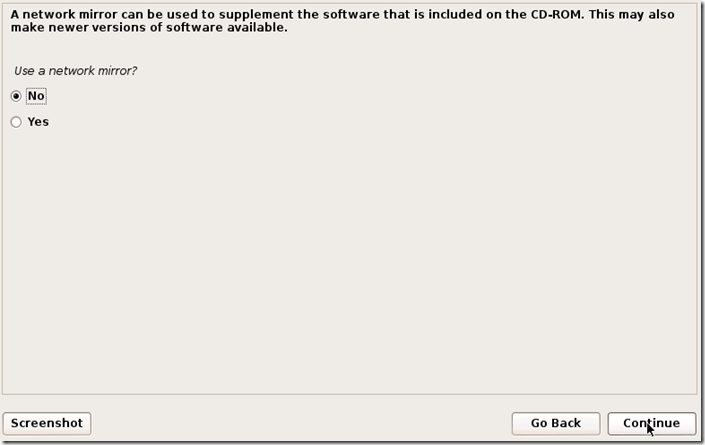
        Alright, Kali has finished installing and now you are presented with a window that asks you about a network mirror. You can just select No and hit Continue.
        step 21
        Step 22:
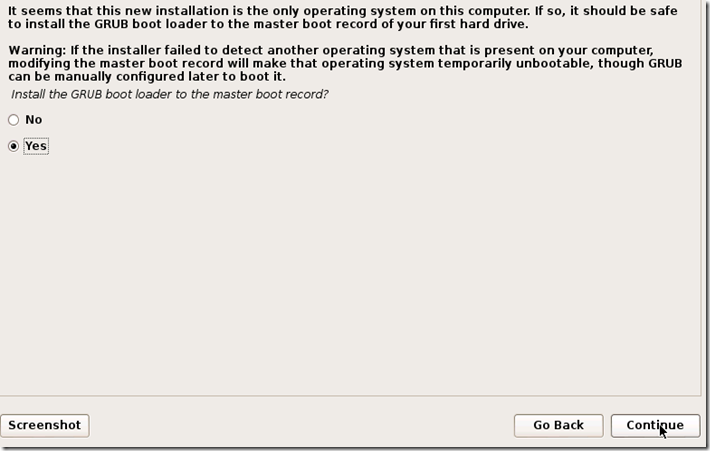
        After a few minutes, the installer will ask you if you want to install GRUB boot loader. Click Yesand Continue.
        step 22
        Step 23:
        The installation should now complete, and you’ll be shown with the following notification message:
        step 23
        Click Continue.
        Step 24:

        After it restarts, login to it with the user name root and the password that you created earlier. 


        ~ jeudi 13 février 2014 0 commentaires

        Creating a Virtual Wireless Network - The easy way

        Now there are 2 other posts on the exact same topic (Creating A dummy wifi for hacking and  Create A Wireless Ad-Hoc Network on Windows 8 Using command line). However, they sometimes don't turn out to be beginner friendly. So this post discusses how to Create a Virtual Wireless Network without any computer knowledge. Just follow these steps word to word, and you will be done. This method creates a WPA secured wireless network.



        1. You will need 2 wireless adapters, since one will be used on Windows (to create a fake wifi) and other on Kali linux (to hack the fake wifi). What I've got is internal wireless adapter and Dlink external adapter. That's enough to do the trick. 
        2. Now,  follow this link to download Virtual Wifi Hotspot for Windows 7 and 8.
        3. Click download, follow the screenshots.
        4. After download finishes, install the program (figure that out by yourself, its an easy setup)
        5. Enter the details in the application, and click on Start Virtual Router Plus.
        6. You'll see a successful message on the taskbar, and the internet connections will reflect the same.
        Note : This can't be used to create a WEP protected wireless network

        ~ 0 commentaires