Affichage des articles dont le libellé est best how to. Afficher tous les articles

Control Your PC Via Your Android Phone using Google chrome remote desktop-2015 remote access

Control Your PC Via Your Android Phone using Google chrome remote desktop-2015 remote access


smartphone and computers let you get things done anywhere and everywhere, but portability becomes more bane than blessing when you forget a critical file at home, especially if you're the type of person who dumps files on your desktop rather than a Dropbox folder.here i am going to use Google's Chrome Remote Desktop for control your pc with the help of your android device easily.this service, first launched in 2011, is coming to mobile. But now, the company released an Android app that will let users access their desktop computers, whether through a Chrome web app for Mac, PC, and Linux or through Chrome OS itself. Once you've set up your primary machine, you can launch the Android app to connect to it. GigaOm reported a few days ago that the app was in beta testing, but it's now available to anyone with an Android phone or tablet, though doing much with the former will be a little cramped. There's no precise date given for an iOS version, but Google says it will be coming later this year.

Since releasing Chrome Remote Desktop, Google has increasingly added ways to connect desktop computers with other devices. Hangouts got a remote desktop feature in mid-2013, and the Chromecast dongle pulls Chrome tabs onto a TV with a minimum of hassle. Outside its ecosystem, other companies have offered similar apps, including Microsoft, which added native remote desktop support in Windows 8 and released apps for both iOS and Android in late 2013.

Now follow step by step full guide to control your pc or laptop using your android phone no root required.

Step:1) First of all you need to download and install chrome remote desktop .apk file in your android device or tablets ,for download it simply go to google play store in your android mobile phone and install Chrome Remote Desktop
 
"or you can download it directly using below link."

<< download link>>
 

Step:2) Now i assuming that you download and install google remote desktop from step 1, after installing when you will click on the chrome remote desktop app on your phone, it will show you a screen like the one given below.

Control Your PC Via Your Android Phone using Google chrome remote desktop-2015 remote access


Step:3) after step 1&2 you need to install chromo remote desktop extension ,for this simply first  go to your PC and Open Chrome Browser and click this link for install extension


Step:4)
give permission to chrome remote desktop authorize, click "continue" button


Control Your PC Via Your Android Phone using Google chrome remote desktop-2015 remote access

Control Your PC Via Your Android Phone using Google chrome remote desktop-2015 remote access


Step:5) It will take you to chrome://chrome-signin/ page. Sign in here with the same gmail account as of your android phone.


Control Your PC Via Your Android Phone using Google chrome remote desktop-2015 remote access


Step:6) After clicking on that an exe file will start downloading. Install that .exe file once it gets downloaded. Continue the process.

Step:7) It will prompt you to choose a six digit PIN. This six digit PIN is the same PIN which will be required as a access key for pairing up with your PC.


Step:8) after that  go to your phone and click on chrome remote desktop again and you will find your computer there. Click on your PC icon.(see below screenshot)


Control Your PC Via Your Android Phone using Google chrome remote desktop-2015 remote access

Step:9) now here you need to Enter the same six digit key which you chose just before in step 7


Control Your PC Via Your Android Phone using Google chrome remote desktop-2015 remote access
 

that's it friends you have done !  you are now using your computer through your phone.


Note :
that You must be connected through internet in your Phone as well as your PC to do that. You can also use chrome remote desktop to connect one PC to another.


Over to you :


In the end, the new Chrome Remote Desktop app is a welcome addition to the Android family, delivering a truly user-friendly experience that's oh-so-rare in the world of remote desktop software. It's fast, it's easy, it's free, and you don't even need to install any additional software on your PC if you're already using Chrome. What's not to like?

~ mercredi 24 juin 2015 0 commentaires

how to enable usb debugging mode on your android device or tablets-for All android version 2015


USB Debugging Mode is a mode that can be enabled in Android after connecting the device directly to a computer with a USB cable. The primary function of this mode is to facilitate a connection between an Android device and a computer with Android SDK (software development kit). As the name might suggest, Android SDK is a software suite that’s designed to aid in the development of Android apps.

Ever wondered how a programmer creates apps on the Android? They definitely don’t code them straight on the phone device! That would be nightmarish at best. Instead, they utilize the environment of the Android SDK to code apps on a computer, use USB Debugging Mode to transfer those apps to a device for testing.

But, again, here’s the takeaway: USB Debugging Mode establishes a direct connection between an Android device and a computer and readies it for deeper-level actions. That’s the important part.

Why Is USB Debugging Mode Important?


USB Debugging grants you a level of access to your device. This level of access is important when you need system-level clearance, such as when coding a new app. However, there are a few non-development-related benefits from this new level of access that can give you much more freedom of control over your device.

For example, with Android SDK, you gain direct access to your phone through your computer and that allows you to do things you normally couldn’t, like snag instant screenshots of your device or run terminal commands with ADB. These terminal commands can help you restore a bricked phone–a useful tool for any adventurous Android owner. Without it, you’d have to get a replacement phone.

**lets see how to turn on debugging mode on different android version:**


#1. Android 2.0-2.3.x


if your android version is 2.0 then follow steps an enable your usb debugging in single minute.
Settings > Applications > Development > mark on USB Debugging.
 
see below screenshot and understand how you can on debugging mode:
 

#2. Android 3.0- 4.1.x

Settings > Developer Options > USB Debugging.
 
see below screenshots and understand how you can on debugging mode:

#3. Android 4.2.x and higher.

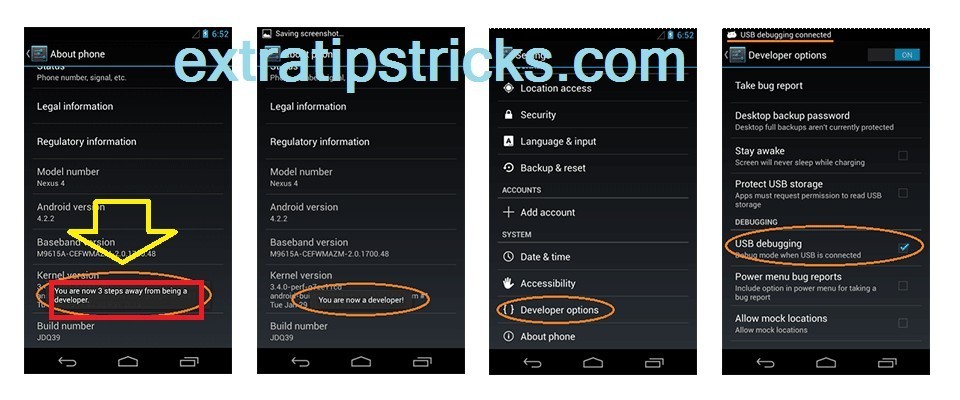
if you have the smartphone having android version 4.2. or higher then you feel problem.many of us don't know that the developer option is hide in android 4.2.x or higher that's why faced problem during enabling  usb debugging mode but don't worry you can unhide this developer option by using simple steps  follow below given steps .

Step:1)  In order to enable debugging mode First of all . you need to enable "Developer Options Menu". so follow below 7 steps.
  •     first Click Menu button to enter into App drawer. 
  •   after that Go to "Settings".
  • now here Scroll down to the bottom and tap "About phone" or "About tablet" or just simple "about"
  • after that ,Scroll down to the bottom of the "About phone" and locate the "Build Number" field.
  • Tap the Build number field seven (7)  times to enable Developer Options. Tap a few times and you'll see a countdown that reads "You are now 3 steps away from being a developer." 
  • When you are tap 7 times on build number , you'll see the message "You are now a developer!". 
  • Tap the Back button and you'll see the Developer options menu under System on your Settings screen.(or above the "about phone")

if you faced problem in above steps then follow below clear and simple screenshots which is useful for you i hope.


Step:2) Now the time come to enable usb debuging mode , you can enable USB Debugging mode by simply Go to Settings>Developer Options>USB Debugging. Tap the USB Debugging checkbox.

see below screenshots for understanding step 2:


#4. Android 5.0 Lollipop

for your kind information friends ,To enable USB Debugging on Android 5.0 Lollipop is the same as Android 4.2.x.Developer option also hide in android lollipop 5.0.
follow bellow process to unhide developer option

   first of all go to  Settings > About Phone > Build number > now here you need to tap "build number" 7 times to become developer;


if you faced problem in above steps then follow below clear and simple screenshots which is useful for you i hope.


 step:2) now step come to enable debugging mode by simply going  to  Settings > Developer Options > USB Debugging.


see below steps to understand step 2:


You need to do for your security:

In this section of enabling usb debugging option ,USB Debugging should only be enabled when you need it otherwise not. Leaving it enabled all the time is kind of a security risk for that this mode grants you high-level access to your device. Say if you connect your Android phone to a USB charging port in a public location, the port could use the USB access to your phone to access data on your phone or install malware. This could happen when and only when USB debugging mode is enabled.

To disable USB Debugging and other developer options when you don't need them, slide the switch at the top of the screen to OFF.

i hope my friends you can enable debugging mode using my this post ,and i think this is perfect for all type of android version users.If you still having problem feel free ask me or comment via comment box.
if you like this article please share it (socialize it)

Tags:

debugging mode on android
how to enable debugging mode on android with broken screen
how to enable debugging mode in android using pc
how to enable debugging mode htc one
what is usb debugging mode in android
how to enable debugging mode in android using pc
how to disable debugging mode on android
how to enable debugging mode in cyanogenmod
how to enable debugging mode on galaxy s4
how to enable debugging mode on galaxy s3
how to enable debugging mode on note 3
How to enable usb debugging mode on android 4.2.x and higher?
how to enable debugging mode on galaxy s5
how to enable usb debugging on Android 2.0-2.3.
how to enable usb debugging on Android   3.0- 4.1.
how to enable usb debugging on Android  5.0 Lollipop
how to enable usb debugging on Android 4.2.x and higher.

~ 0 commentaires

Changing Administrator Password using Command Prompt(CMD) in your windows 7,8 or 8.1 -2015

change your windows 7,8 or 8.1  password without any software using cmd(command prompt) 2015
 

Hello friends in today everybody wants to crack password of windows login screen ,I am sure you can Change windows  Administrator Password using Command Prompt(CMD) .After reading this full article step  by step, Here I give you best way of using cmd for reset password in simple steps by which you'll be able to change your(or anyone's) Administrator account password in windows 7 ,window 8 or 8.1, without asking him the previous password.Generally when we change any password it required the old password but in this tutorial you don't need to put the old password.I'm going to divide this article into two part for your clear understanding. but our motto is to change windows administrator password without knowing the old one.

  • 1) change windows password when you know old password(not recommended)
  • 2) chenge windows password  without knowing the previous one(reccomended)

ALSO VIEW: 

#1)change password when you know old one


Changing your Windows 7 password on a regular basis is a good habit to help keep your PC secure. You might also want to change your Windows 7 password if you've been having problem remembering or entering your current one.
if you know previous password then you can easily change password  see below steps for change your windows 7  password .
  • Click on Start and then Control Panel. 
  • Click on the User Accounts and Family Safety link.

Note: If you're viewing the Large icons or Small icons view of Control Panel, you won't see this link. Simply click on the User Accounts icon and proceed to Step 4.
  • Click on the User Accounts link. 
  • In the Make changes to your user account area of the User Accounts window, click the Change your password link.
  • In the first text box, enter your current password.
  • In the next two text boxes, enter the password you would like to start using.
  • Entering the password twice helps to make sure that you typed your new password correctly.
  • In the final text box, you're asked to Type a password hint.
  • This step is optional but I highly recommend that you use it. If you try logging in to Windows 7 but enter the wrong password, this hint will display, hopefully jogging your memory.
  • Click on the Change password button to confirm your changes

Also view:


2) change window 7 or 8 ,8.1 password without knowing the old password:


For your kind information there are so many software which is useful for cracking password but you know the same thing can become possible, if perform the same task through Windows Command Prompt(CMD).

note:Below given  hack only works when you're logged in to the Administrator(or administrator like) account. This hack need Administrator(or administrator like) privileges, unless it shows "System 5 Error".

now don't wasting time come on and read this full tut step by step procedure to change windows password ,It would hardly take 5 minutes to crack admin password with that method.

Step by step guide to change or reset windows 7,window 8,window 8.1 password


Step-1)first of all you need to open command prompt(cmd)in administrator mode ,if you don't know how to open cmd simply go to start, and search CMD and do right click on CMD and select RUN AS ADMINISTRATOR(it's the most important step of this hack, unless "System 5 Error" will be shown in the end) and then click OK.
(see screenshot below)


change your windows 7,8 or 8.1  password without any software using cmd(command prompt) 2015
 
windows 8 or 8.1 users  press window key + x and select command prompt(admin) (see screenshot below )


change your windows 7,8 or 8.1  password without any software using cmd(command prompt) 2015
 
Important: Most of the users don't read the whole sentence and press Enter right after searching CMD in this step. Those users get an error named System 5 Error. So, please don't press Enter directly on CMD use it as administrator mode(admin mode)


Step-3)now after open cmd(you see a black window) type the following command in the cmd box and  press ENTER It will give u the names of all the USER accounts existing in your computer.

NET  USER

note:here, there's a SPACE between NET and USER

change your windows 7,8 or 8.1  password without any software using cmd(command prompt) 2015


Step-4)
when you execute above command you see the all exists user account  Here, in this above given pic, you are getting three names, which are "Administrator", "Guest" and "PC". We are not at all interested in the Guest account for sure. So leave that. Now the two accounts are left. One is Administrator and the other is PC. Here, the both the accounts are having admin priviledges. In most of the cases the main admin account, which is ADMINISTRATOR here, is hidden. And the other account, named "PC" here, is shown, which is a ADMIN-LIKE account. So, this account also have full admin priviledges. Because only one admin account which is visible here is PC, so we will deal with this account in this process.

STEP:5) now i hope you understand above lines  So, now use our next command,simply enter below command in cmd box and hit enter.(see screenshot for your clear understanding)

 net user PC *


note:Here, there's ONE SPACE between NET and USER as well as between PC and *


change your windows 7,8 or 8.1  password without any software using cmd(command prompt) 2015
 
Step-5) when you execute above command Here u are, now directly enter the new ADMINISTRATOR PASSWORD and press enter again confirm ur new password and press enter.(see above pic)


note:  You will not see any ************* type of characters in the CMD window when you will be typing your password. But you don't worry. They are not visible but they got typed. Re-type the same password in Confirm Password option.

Step-6 : ) After all you have done! successfully change your or anyone's windows password ,Just EXIT cmd box.


important: This hack is thus NOT POSSIBLE if you are logged in with the GUEST ACCOUNT. If you want to crack the admin password without been logged in, then also, there're lot of ways of doing that. I will post one of the easiest very soon. You will then be able to crack the admin password without been logged into the system.

how to apply this method on your friends windows pc


The application of this method comes into use when you want to change your friend's admin password, who would have been logged in through his admin account for sure. If he has gone somewhere for sometime now you get approtuniy and use it, then you can change his pc admin password within seconds for fun. You can surely impress him/her with this small trick.

I will soon post the method for cracking the Windows admin password without been logged in with any account. That is admin password can also be cracked. Stay tuned.

I hope you would find my post beneficial for you. Although I have included all the smallest to smallest steps in the post. But still if you encounter any problem, then do tell me. You can comment below your queries.
All of your queries will be answered within an hour, or even more soon
If you don't encounter any problems and find my post great, then please don't forget to appreciate it. You can also share my post


share my site please if you like my article

~ jeudi 18 juin 2015 0 commentaires

How To Create A Wifi Hotspot On Your PC And Share Your Internet with others

How To Create A Wifi Hotspot On Your PC And Share Your Internet with others


Hello friends i hope  you are fine.Are you using internet on your PC and want create a WiFi hotspot on windows 7 or 8 Computer so that you can use the internet on your mobile phone or nearby computer also.Everybody's got a wireless network at home, but if you've ever wanted to get your iPod touch, iPhone, or other wireless device connected, but all you've got is a wired network at work, school, or elsewhere, Windows 7 makes this process trivial.Now-a-days internet connectivity has become one of the things that we need the most. It would be nice if we can use our computer's fast internet Connection. So guys the solution is Wireless Hosted Network. This concept of Wireless Hosted network was introduced in Windows 7. By using this feature we can easily create a virtual wireless adapter,To do this we only require a CMD(Command Prompt!) with Administrator privileges. And best of all you can connect to another WiFi when Hosted Network is running. This process describes some of the commands that are available only in Windows 7 or Windows 8 Ready PC.

Before going towards today's article how you can create wifi hotspot on your computer or laptop first i want to tell you what is wifi hotspot , Wireless (or wi-fi) hotspots are essentially wireless access points providing network and/or Internet access to mobile devices like your laptop or smartphone, typically in public locations. To put it more simply, they're places where you can take your laptop or other mobile device and wirelessly connect to the Internet; some devices and smartphones also act as mobile WiFi hotspots.


 Here i am going to provide you a  simple guide with full of step by step procedure to turn your windows PC do that. No, rocket science is required, Just follow steps below.

Step:1) for creating WiFi hotspot you need to make a notepad file so First of all copy these two lines which is given below and paste it in notepad and Save it as wifi.bat on your desktop or in any folder. This will act as a quick launch button for starting WiFi hotspot.


Netsh Wlan Set Hostednetwork Mode=Allow Ssid=Wifiname Key=Wifipassword

Netsh Wlan Start Hostednetwork


Note:  here you make to change in rename wifiname and wifipassword
The ssd will be the wifi name with which it will be visible to nearby phones or computers. The wifi password will be the required password for the device to get connected to your PC.


Step:2) after make notepad file wifi.bat Now click on that icon wifi bat on your computer.


 Step:3)
one last thing you need to do that is simply   Go to control panel >> Network and Sharing Center and Change Adapter Settings of your Ethernet.


How To Create A Wifi Hotspot On Your PC And Share Your Internet with others

step:4) Now go to your phone and search for available WiFi network


Cheers! As you have Just created a WiFi Hotspot on your computer successfully.

Reverse action:


1st way:


If you want to stop sharing   just Go to control pannel >> Network and Sharing Centre and disable it.

Alternatively way:


The alternative way is to create a batch file which act as a stopper .

1) first of all copy below code and past it in notepad and save as stop-wifi.bat

 
netsh wlan stop hostednetwork

2) now when you need to stop WiFi hotspot simply double click on this stop-wifi.bat file


that's it this is overall article for create WiFi hotspot on your window pc.
If you like it please share it with your friends :)

~ mardi 16 juin 2015 0 commentaires

How To Search Google Directly For Mp3 Links

 
I love song and i know you also like to listen song in free day. All of us download mp3 songs from internet and use those mp3 download websites. But the only problem which i face is that these sites are stuffed with pop up ads with big downloads banner written and the real download link is hidden somewhere which a rocket scientist can only find. Google has indexed thousands of webpages that are simply directories full of mp3 files. These directories are hosted by many different people all across the Internet.

By adding some commands to your Google search, you can restrict the results to show only pages with links to mp3 files on them.
But here in this article i am going to tell you a simple way in which you can directly find the download links of tat song, without using their ad stuffed web page. You can just go to their page to directly save that mp3.

follow below guide for download your mp3 without having any problem.
 

Step:1) first of all you need to pic the name of any song name which you want to download in my case I have to download "Any body can dance "

Step:2)now when you choose song name simply go to Google.com and type below command in search bar and hit search button.


intitle:index.of?mp3 Any body can dance

 
Note: You can change that with the song which you want to download.

Step:3)now Google uncle show  you result simply Open any search result page. You will get the links of download for tat song.


Step:4)
now a window will be open Just right click on any of the link and save it to your computer.


That's it, A simple clean and ad free way to download your song. Cheers

i hope you like it :)
please share it ,don't forget to like on Facebook.

~ 0 commentaires

best android hack to increase internet speed in android phone or tablet 2015

best android hack to increase  internet speed in android phone or tablet


Hello friends today i am coming with an article which is helpful to  increase your android phone's  internet speed . If you don't know how to boot your internet speed then you come in right place.As it is with any other desktop or mobile operating system, the performance of your Android OS will start to diminish after you use it for some time. Mobile operating systems are supposed to be lighter and faster to keep up with our need to be on the move, yet still give us access to everything. Want to have the best of both worlds? Then, it's time to do some housekeeping. Nowadays internet is one of the major source of entertainment. People uses internet on their personal computer/devices like Android, iPhone etc to get connected with their friends OR loved once, They also spend time on internet watching videos or movies, playing online games etc
But it is very difficult to do these stuff on a slow internet connection while you are on a desktop, laptop OR any portable device like mobile phone, tablet but do you know that you can easily boost up your internet speed on desktop or laptops with many tools and software like Net Speed Booster which is easily available on the internet.

If you have noticed that your Android phones performance have been slowing down, particularly after you've been loading it up with tons of Android apps (we don't blame you) from the Google Play store, we have a few tips to share with you.which are is helpful to regain your internet speed, lets see how to increase internet speed on android.


also view:


Best Android Hacks to maximize the speed of your internet connection:


#1) Use UC Browsers instead of other browser.


best android hack to increase  internet speed in android phone or tablet

On android devices, UC Browser in the fastest browser. It can help you to browse OR download things faster as compared to any other browsers. This 3rd party app is more user-friendly and use fewer resources which makes it faster.

Note: you can Get UC Browser for your android device from Google play store.

#2) Use 4G instead of 3G:


best android hack to increase  internet speed in android phone or tablet


Many of the android devices now support 4G network, But by default the network connection priority is set to 3G. So you can switch your network to 4G to increase your internet speed. Follow these steps:
  • Go to Settings of your android device and  Click on "More" > "Mobile Networks" > Preferred network type > Select "4G"

  • OR in some android devices the, It should be like this: "Settings" > "Wireless & Networks" > "Mobile Network" > Select "4G"

#3) Block 3rd party apps from using the internet:


Some android apps use internet in the background, This can make your internet slow whenever you are using it. So you can block their access by using DroidWall OR NoRoot Firewall.


Note: you can download both app (DroidWall and NoRoot) from Google play store its free.


#4) USE these Top apps which are useful to boost your internet speed.


best android hack to increase  internet speed in android phone or tablet


There are many apps in Google play store which offer to boost internet speed but Here are 8 Android apps that can help boost speeds to tolerable levels, and help you survive the long holiday gatherings.that some of them only work with rooted devices.I hope these apps are useful to boost the internet speed on your android device.

 Note: Sorry Here i am not provide you direct link for download these below listed apps because of broken links so you can directly download them from Google play store its available here .Some are paid apps but don't worry you can hack paid apps and games easily using black-mart app if you want full tutorial on how to hack paid apps try my previous guide which is all about how to hack android paid apps..

1-Internet Booster & Optimizer


Internet Booster & Optimizer is an Android app thatcomes with a series of commands that prioritizes the browser among the other applications that are using the Internet. This means that one can dig out more speed from the available Internet connection. It usuallypauses the secondary apps that are using Internet, cleans RAM & cache memory and flushes the DNS to make sure that most of the Internet speed is utilized by browser only.

2-Faster Internet 2X


Faster Internet 2X provides a convenient way to get more speed from 3G and 4G cellular networks. The app is designed using special programming scripts that will boost the Internet speed to approximately twice of what's available. This provides a better Internet user experience.It works fine with both rooted and non-rooted Android phones. The app displays ads that can be disabled.

3-Internet Speed Booster


Internet Speed Booster isan easy-to-use app with a sleek and minimal design. It uses a unique algorithm that can increase the Internet Speed of your Android device with a single tap of your finger. Internet Speed Booster app is designed in a way that has it working impeccably with rooted as well as non-rooted Android devices.

4-Internet Speed Master


Internet Speed Master is a nice app with around 1 million installs from around the globe. The app adjusts the TCP/IP settings by modifying the system files to improve the Internet speed of one's Android device. It is advised to make a backup of your device's content before trying this app. It isdesigned for almost all types of ROM and can be used for all Android devices.

5-Internet Booster (Root)


Internet Booster (Root) uses a different method for getting more out of the available Internet connection. It basicallychanges the configurations of system ROM to increase the Internet speed to 40% to 70% higher than before. Internet Booster (Root) only works with Rooted Android Devices which means one shouldallow the Super User privileges to run this application properly.

6-Free Internet Speed Booster


Free Internet Speed Booster is another Android app which could possibly help you get rid of the slow Internet speed. It increases the Internet speed from 40% to 80% more than usual by improving the Ping latency, halting the unnecessary background apps and managing a balance between parallel connections. Free Internet Speed Booster does not require a rooted Android device.

7-3G Speed Booster


3G Speed Booster is a small sized app that helps you get more speed from your 3G. There are some background apps that consume Internet bandwidth excessively, 3G Speed Booster scans all the background apps that are using Internet and disables them to give twice the Internet speed to your Android device. This app works efficiently with 3G networks only.

8-Internet Speed Booster 3G/4G


Internet Speed Booster 3G/4G appenables a user to load websites and stream videos at a speed which is equivalent to 3G/4G Internet speed. It may increase the Internet speed from 30% to 40%. This depends on the strength of the signal available to the Android phone at that time. This app works for both rooted and non-rooted Android phones.

#5) Remove Unwanted Apps


best android hack to increase  internet speed in android phone or tablet


Every app you install in your phone take some storage space and runs some background processes. The more storage space occupied or the more background processes running on your phone, the slower your phone's  performance

also view:


Extra Tips Tricks (Bonus) :


1) Always clear your android's memory cache, This can help allot if you don't know how to delete cache then follow this steps go to "file manage">>find the folder named "android" open it and delete "data " folder .


  • 2) Browse internet with Block Image Search option, This can speed up your browsing

  • 3) Don't run more than 2-3 apps while browsing the internet as this can reduce your internet speed .Use task killer app which is useful to kill your task try google play store to install .

  • 4) Make sure that the Auto-Update feature is disabled for apps that are not so important


If you follow the above-given suggestions, tips and tweaks will help in making your Android faster and smoother while in use. Have other Android-related performance-enhancing tips and tricks? Let us know.
i hope you enjoy this article
if you like it please share it ,i need your support.
thank you for visiting here ,I am waiting for your  next visit .


~ dimanche 14 juin 2015 0 commentaires

How to root any Android device using Root Genius 2015

How to root any Android device using Root Genius


Android is one of the most open, versatile, and customizable mobile operating systems out there. You may think you don't need to root your phone, but you'd be surprised at how much more you can accomplish with a little work.
Root Genius is One click root tool designed to work on Windows Computer. It helps user to root their Android Smartphone in single click. Here, we are going to guide you how to use Root Genius to root any Android Device.Maybe you've heard about "rooting" a phone from a friend or read about it somewhere on the Internet.  Maybe you even kind of know what it is but aren't sure what you can do with it. Or maybe you are already running a rooted phone and looking for more ways you can utilize it.

what is rooting(Android os)  according to Wikipedia:

How to root any Android device using Root Genius


Rooting is the process of allowing users of smartphones, tablets and other devices running the Android mobile operating system to attain privileged control (known as root access) over various Android's subsystems. As Android uses the Linux kernel, rooting an Android device gives similar access to administrative permissions as on Linux or any other Unix-like operating system such as FreeBSD or OS X.

Rooting is often performed with the goal of overcoming limitations that carriers and hardware manufacturers put on some devices. Thus, rooting gives the ability (or permission) to alter or replace system applications and settings, run specialized apps that require administrator-level permissions, or perform other operations that are otherwise inaccessible to a normal Android user. On Android, rooting can also facilitate the complete removal and replacement of the device's operating system, usually with a more recent release of its current operating system.

TOP 10 reasons to root your Android phone:

Here are 10 reasons rooting your phone is worth the hassle.
  • Unlock Hidden Features and Install "Incompatible" Apps 
  • Automate Everything
  • Boost Your Phone's Speed and Battery Life
  • Block Ads in Any App
  • Back Up Your Phone for Seamless Transitions
  • Remove Preinstalled Crapware
  • Tweak the Dark Corners of Android
  • Flash a Custom Kernel
  • Flash a Custom ROM
  • Truly Own Your Device

Disadvantages of Rooting Your Android


let's take a look at the demerits of rooting your Android.
  • 1- Your Phone Might Get Bricked

  • 2- You End up Voiding Phone's Warranty

but don't worry friends forget this disadvantages try Google uncle to fix this problem easily , the solution of these problems present their.

Requirements:

 If you are using any Antivirus Application on your computer then disable it first then after follow the below tutorial.

How to use Root Genius to root any Android Device


Step 1: first of all you need to enable debugging on your android phone,here you have three ways to do it according to different android os version.
  • 1) for android 2.3 or earlier: Enter settingapplication"development"usb debugging"

  • 2)for android 3.0 to 4.1 : Enter setting developer option<usb debugging

  • 3) for android 4.2 or newer : in this version of android debugging mode is hide so first Enter "setting" <about phone" build number"  for several times until getting a note you are under developer mode<setting<developer option usb debugging .


Step 2: After enable debugging mode now simply Download  Open Root Genius Application on your Windows Computer.

Step 3:  when you install  root genius now  launched it, connect your Android device to the computer .

Step 4:
Once Your Smartphone is connected successfully to the computer, Root Genius will automatically detect your Android Device.

How to root any Android device using Root Genius
Step 5: Now, Click on the Root Now button to begin the rooting process.


How to root any Android device using Root Genius
 
Step 6: Now, Root Genius will automatically Root  your Android Device and install the KingUser Application.
How to root any Android device using Root Genius

Step 7: Now your Android Device is Rooted. To check whether your phone is rooted correctly, open Applications Menu, there you will be able to see a new app installed, called KingUser. If this app exist then it means you have successfully rooted your device.

Optional way to check your device rooted or not:


 there are many apps which are useful to varify your android device rooted or not .but here i provide you best app which verify that your device is successfully rooted or not by Root Checker  Application.you can download Root Checker in your android device from below given link .

<< download link>>

If you like this article please share it
thank you very much fo visit here :)

How to root any Android device using Root Genius


~ samedi 13 juin 2015 0 commentaires

5 Methods -How to Recover lost/Deleted data on Android 2015 (root or unroot)


5 Methods -How to Recover lost/Deleted data on Android 2015 (root or unroot)


hello friends i heartily welcome you in this blog extra-tips-tricks .Today I am going to provide you a best article which is all about how you can recover your deleted items .I know this is the big problem we face every time,but don't worry here I provide you 5 best method which are useful to retrieve your permanently deleted pictures,videos,documents,etc.For your kind information this article is only for android smartphone users and given all 5 method only work on android device.You have accidentally deleted your important files on Android Smartphone? Now, not to worry any more, we have the solution for how to recover deleted files on android.By using below given ,method I am sure that you can easily get back your important data, contact details, important messages, notes, audio files, videos, graphics, wallpapers etc. that are lost accidentally or due to some error i.e. Recover deleted files android. We have the best android data recovery software & app for android which can help you to easily recover deleted files on android device. Now you don't need to worry about losing your important data and information from your android smartphone as you can easily get back everything (recover deleted files android) by installing this selected best android data recovery app & software for android.


5 METHODS TO RECOVER DELETED FILES ON ANDROID


So don't wasting your time friends lets continue today's tutorial Below are the 5 best and advanced methods to recover your lost or deleted data from your Android device (recover deleted files android):

#1  RECOVER DELETED FILES on ANDROID using POTATOSHARE


The data of your Android phone may be lost for various causes: delete mistakenly, format SD card, factory reset by accident, failed to upgrade, make a root, or other mis-operations. And you may get into trouble about How to rescue the important contacts, SMS, photos, videos and other document files from Android. If you are looking for data recovery software for Android, look no more, as this anvanced data recovery app for Android has got just what you need. Sophisticated yet easy-to-use, the program provides an easy way to recover contacts, SMS, images, music songs, videos, documents, archives and more data from Android phone.

Requirements

Windows 7/2008/2003/2000/Vista/XP/NT


Steps to know how to recover deleted files on android by Potatoshare's software:

STEP 1:
First of all you need to download android data recovery software by Potatoshare and install it in your PC.you can download it from below given link.

  << download link>>

STEP 2: now Enable USB debugging mode in your android device from your Android setting app.

STEP 3: after enable debugging mode simply Connect your android device with your PC via cable.


STEP 4:
when you connect your device with your pc you can see two options in software:
  • 1) Scan contacts, call history and messages
  • 2) Scan photos, videos or other files


Now, if you want to recover contact, call history and message then simply  click on first option. And if you want to recover photos, videos or other files  click on second option. If you wish to recover all deleted files from android then click on both the options.

step:5)
when you click on appropriate box don't do anything simply click on START button.


STEP 6:
After clicking on start button, the software's scanning process will begin. When scanning process gets done, you will see the deleted files with previews under different types of tabs. Select the files which you would like to restore on your Android device. Now click on Recover button, don't worry it will take couple of minutes to recover deleted file on your android device. When the recovery process is done, you can now able to see deleted files on your Android device

#2  how to recover lost data from Android using android data recovery program.


It is a wonderful data recovery tool for android smartphones Recovery-Android is one of the best company helps in android recover deleted files & provides various android data recovery, rooting, backup and video converting applications for Android devices. Android data recovery app called Data Recovery Machine for Android developed by Recovery-Android is one of the most trusted and reliable app for recovering deleted files from Android smartphone and tablets. Main recovering areas are videos, messages, images, contacts and other files which help safeguard your phone,set it up for easy recover when it gets lost ,and prevent your data from falling into the wrong hands.

Follow easy steps to know how to recover deleted files on android by Recovery-Android:

STEP 1:)
First of all you are required to download android data recovery software provided by Recovery-Android on your PC.you can download it from below link

<>


step:2)  when you download successfully you need to install it in your pc

STEP 3:) now you need to enable debugging on your android phone,here you have three ways to do it according to different android os version.
  • 1) for android 2.3 or earlier:Enter "setting"

  • 2)for android 3.0 to 4.1 :Enter "setting "

  • 3) for android 4.2 or newer :enter "setting"<


STEP 3:
now after enable debugging mode Connect your android device with your PC with USB cable. Now, open the software of android data recovery which you have installed previously in your PC.

STEP 4: you need to wait for few seconds till software to recognize your android device in the app. After detecting, click on green start button to start scanning the device. Now look at your android device, if it shows any pop ups for permission, click on ALLOW.


STEP 5: don't panic Scanning process will take a couple of minute to scan your whole device, generally it's depends on the storage of your android device. Once the software has completed its scanning process, you will see several files on your screen with red marked. These are the files which were deleted from your Android device. Now select those files which you would like to restore from device by marking the checkbox next to it and then click on RECOVER button.

That's it guys !

#3 how to recover deleted data from android with remo  recover tool


Remo Recover for Android is specially designed to recover data from Android phones. The application vigorously scans both the internal and external phone memory of the device, to identify lost or deleted files, including Android application package files (APK), and restores them for reuse

Advanced Features

  • Preview of all recoverable files 
  • Quick deleted file recovery
  • Recovers all music, image and video files including .apk files
  • Scans SD cards
  • Scans internal phone memory and external phone memory areas
  • Ability to create SD card replica image files to perform recovery at a later stage.
  • Retrieve data from improperly mounted SD cards (Cards with corrupt file system)
  • Save recovery session to avoid re-scanning

Why Remo Recover for Android recovery?

  • Fast and effective 
  • Safe, easy and secure
  • Robust software
  • Free trial version
  • Simple user interface
  • Virus / malware free
  • Nominal disk space requirement for installation
  • Free customer support

System Requirements:

  • Operating System  Microsoft Windows 8, Windows 7, Windows Vista, Windows XP, Windows 2003 and Windows 2008 
  • RAM 1 GB RAM (Recommended, 2 GB RAM)
  • Free disk space 50 MB (for installation)

Note: You must log in to your Windows PC as Local System Administrator to install the software

 
you can download it on your pc from the below given link.

<>

#4  RECOVER DELETED FILES from android using YODOT


Yodot is the most trusted company name developing android data recovery software for PCs and Android devices. Recovery from Android app developed by Yodot has a user friendly interface and lets you recover deleted files android. This software also provides the preview function from which you can see the preview of deleted videos, music and images. Aside from this you can also save the recovery session which you can use to recover additional files without rescanning your device again.It is most useful software for recovering deleted photo ,generally many photographer use this software .


simply Follow this guide  to recover deleted files from your Android device:

 
STEP 1: First of all download Yodot recovery from android software and install it on your PC.

STEP 2: Enable USB debugging mode in your android device and connect it to your PC via micro USB cable.

STEP 3: Now open Yodot recovery from android app and select recovery option. There are also two options:
  • Deleted file recovery 
  •  Lost file recovery.

STEP 4: Your device will now detected via software. Now select your Android device storage and click Next button.


STEP 5:
Software will now scan your whole android device for deleted or lost files. Once scanning process is done, you will see your deleted file or lost files with different folders.


STEP 6:
Select the files which you would like to recover on your android device. Now click on Next button, the recovery process will start. It will take couple of minutes to recover the lost data [how to recover deleted files on android]


After recovering process is getting done, you will recover deleted files on android device.

#5 how to use  DUMPSTER  RECYCLE BIN ANDROID DATA RECOVERY APP


There is an app called Dumpster  Recycle bin in Google Play Store. This is one of the best data recovery android app which can recover deleted files from android device (android recover deleted files). You can find many apps in Google Play Store to recover lost files on android but Dumpster  Recycle bin does a pretty good job in this. Currently this app only supports recovering deleted photos, videos and documents. Message and contact recovering function is currently not available. This is app is used by millions of Android users and it works fine on most Android devices.

Follow below steps to know how to recover deleted files on android:

STEP 1: First of all download and install Dumpster  Recycle bin app in your android device.(Not pc )

STEP 2:
when you install simply Open the app and click on the refresh button at top of the app. when you click on refresh button It will start scanning your device for your deleted and lost files. After refreshing process gets done, you can see your deleted files in the app.


STEP 3:for retrieve your desire file you need to  Long press on the file which you want to recover. You will see the pop up, click on preview button to see the files inside and click on restore button to restore it successfully in your android device


STEP 4: That' s it! The file is now successfully restored on your android device. This app is very handy and easy to recover deleted files on Android device.


These are the most successful methods on how to recover deleted files on Android. If you find any difficulties or stuck on any step, comment below. We will provide full guidelines to recover your lost data from android device

I hope you enjoy this post and using above method you ca successfully restore your deleted data easily. ,if you like this  please share it with your friends,also don't forget to join me on facebook .


please  share my site if you like

~ 0 commentaires